Pipes and foundations

At long last, things are happening that feel like real progress in our renovation project. We are getting ready for the first stage of installing our insulation.

The insulation is everything. We are hoping that the insulation we intend to install is going to keep us warm for most of the year, with very little requirement for active heating. So we are trying to do it right.

After a lot of digging, we did find the lead water pipe and a plastic gas pipe.

After a lot of digging, we did find the lead water pipe and a plastic gas pipe.

The first stage is to dig down by the foundations and insulating them with a foam substance called Frothpak. It will provide the bottom edge of our air tight envelope, making a bridge between the sheets of external wall insulation and the polystyrene that is going underneath our concrete floors.

While we are digging, we are also levelling the ground for a path all around the house. This will make access easier, and keep plants away from the rather fragile external wall insulation.

In the meantime, we also have to think about installing waste pipes for the new bathrooms, finding the mains water pipe as it enters the house, and constructing foundations for our balcony.

So there is lots of digging to be done before we even think about playing with the Frothpak. But at last we’re laying the foundations of our project.


How to build a strong wooden container

At long last, the construction of our raised vegetable bed is finished. It has been quite a process. It’s looking very smart, and we are confident that it will stand up to the pressure of the large volume of earth we are putting into it.

We built this bed for a number of reasons:

1. We needed a place to grow vegetables in the sunniest part of our property.

The finished bed

The finished bed

2. Delicate vegetables needed to be grown closer to the house, so we can keep an eye on them.

3. We need somewhere to put the earth that we’re digging out in order to insulate the foundations of the house.

The solution is a large, tall vegetable bed by the south wall of the house.

We started the process back in November, digging and concreting in the foundations. The wet winter turned those into a moat, and we had to wait for the dryer spring to continue with the breeze block and brick base.

Last week, we built the wooden superstructure out of 6×4 pieces of pine. They are held together with vertical dowels made out of steel reinforcement bars. This is how we did it:

1. Cut dowels out of rebar.

Sparks flying

Sparks flying

We cut 10 cm pieces with a large angle grinder. This process stretches the metal and makes sharp flanges on the ends of the dowels. We filed those off with the small angle grinder. The sparks made this quite a fun job.

2. Cut the wood to size.

We cut the wood as we went along, layer by layer. Alex had a very detailed plan of how the bits of wood were going to fit together. We tried cutting them by hand, but that would have been too tiring and time consuming. The table saw is not really suited for the job, as that is designed to cut wood along its length. In the end the mitre saw did us quite nicely, though we had to turn the planks for a double cut.

3. Drill holes into the previous layer.

Getting taller

Getting taller

We drilled 5 cm holes into the brick for the dowels to fit into. A squirt of glue holds them in securely and prevents water from getting into the holes. When the dowels were inserted, we balanced the pieces of wood on top and gave them a good bash with a lump hammer. This marked the wood so we knew where to drill the holes. Sometimes, when we met a short dowel, we needed to mark the place with a sharpie.

4. Fit it together.

We dabbed each hole with a bit of wood preserving paint. Then we married up holes and dowels and hammered the planks down. When the dowels didn’t quite hit the right spot, a few taps with a hammer soon sorted that out. The pine is quite soft, so there is a bit of flexibility.

5. Corners.

The corners are, of course, quite crucial to the construction. We added a dowel in every corner, stretched some metal tape across them, and nailed them together with 6 in nails. In most places, a spiky metal crown sits around the dowels to give extra grip between the planks of wood.

6. Reinforcements.

As we are filling this construction with several cubic metres of soil, it needed some extra rigidity. Especially the wood on the long side flexed quite a a lot at first. We used some of our old floor joists and attached them to the inside along the length of the planks. A piece of OSB was then nailed to those. The gap in between is filled with rubble for drainage.

7. Drainage.

Rubble wrapped in geotextile

Rubble wrapped in geotextile

Such a big lump of soil also needs some good drainage. This is provided by rubble in a trench around the inside of the brick wall. We stapled geotextile to the inside of the wooden structure, running into the trench. This was then filled with rubble and wrapped around it. Geotextile lets through water but not soil. This should keep the rubble free from grit for a long time, and maintain good drainage. An added benefit is that the rubble helps spread the pressure of the soil inside the bed.

8. Fill it with soil.

As we dig out a path around the house and a trench for our insulation down to the foundations, we will have lots of soil to put in the veg bed. If we fill the smaller piers first, we may be able to plant something in those this year. I’m thinking a salad crop would be great.

Why are we insulating our foundations? Well, that’s another story. Watch this space!

Bricks and mortar: a beginner’s guide

Our renovation project is getting us to do things neither of us have ever done before. This week, we’re trying our hand at brick laying. Here are some things I never knew.

1. Like many DIY jobs, mixing mortar is a bit like making cake. You have to get the right consistency: moist but doesn’t stick to your hands.

2. A good proportion is 1 part cement to 3 parts sand. It’s a good idea to mix one part of cement with one part of sand dry in a bucket before you start the cement mixer. The hardest part is to get the stuff to mix properly in the mixer.

3. Just like cake, the amount of water needed depends on the kind of sand and cement you’ve got. The moister the sand, the less water you’ll need.

Alex's first brick laying project finished.

Alex’s first brick laying project finished.

4. Start with some water in the drum. Then add a couple of spade fulls of sand. Add the sand-cement mix last. This will quickly change the nature of your mix.

5. Aim the sand and cement at the watery mix. If you get it on the dry part of the drum, it’ll just stick there and not get mixed in. Then you need to stop the drum and push it all around with your hands.

6. Keep adding sand and cement. When the mix gets too dry, it will look like small lumps rattling around in the drum. Add a bit more water.

7. You’ve got it more or less right when the mortar becomes one big mass that falls down from the top of the drum as it goes round. A smooth lump sloughing down is what you’re looking for. Now is the time to stop the drum and do a hand test. It needs to be moist but leave your hand virtually clean.

8. Life is a lot easier when your bricks are wet. Put one in a bucket of water while you’re mortaring in the previous one. It’ll help your mortar stick to the brick and will save you a lot of trouble.

9. If you are using reclaimed bricks, make sure they are clean. Any dirt left on them will prevent them from absorbing the mortar and sticking together.

10. If you are a beginner, you’re bound to make a mess on the face of your brickwork. If it is going to be on show, it’s a good idea to remove the excess mortar with a scouring pad at the end of the day.

Good luck! And let us know how you get on.

Constructing a raised vegetable bed

I was hoping to be able to show you the finished product by now. But the construction of our tall raised bed has been slowed down by consecutive bouts of bad weather. First there was the rain of Winter, now there are Spring showers. But never weather dry enough for an amateur brickie to feel confident about.

It’s quite a mighty construction. We want to make the final product about as high as a kitchen counter, so that we can lose quite a lot of soil in there. Soil that will come from digging out the beds up against the house where we want external wall insulation and a clear gravel path.

To keep all that soil from pushing out the walls of the raised bed, they need to be quite sturdy. The foundations are made of concrete, with a double course of breeze blocks on top. The next layer is a single course of breeze block on the inside and bricks on the outside where the wall shows above ground.

Alex constructing the second course of breeze blocks for the raised vegetable bed.

Alex constructing the second course of breeze blocks for the raised vegetable bed.

They are reclaimed bricks that we’ve inherited with the house. They were stacked in the back of the garden for many years, until Alex moved them into the garage to dry out. Because sodden bricks do not make strong walls.

The superstructure will be made out of sturdy 4×6 planks, 6 layers tall at the highest point, and 3 layers tall at the lower level. They will be fixed to the bricks and to each other with steel rods cemented into place. And for extra strength, a few of the old floor joists from indoors will help to hold the longest, tallest wall in place.

Hopefully, with all that, we’ll be able to contain all that soil and have a smart, sturdy raised vegetable bed by the sunny wall of the house.

What to do with an embarrassment of wood

In the last six months or so, Westacre has produced rather a lot of wood. As we will be partially warming our house from a wood burning stove before long, we need to keep hold of it. So we’ve had to be creative about finding places to store it.

It all started when the old wooden windows were taken out in November. There’s nothing much you can do with used window frames, except chop it into wood burner sized pieces. So that’s what Alex did. He stacked it all in the wood store behind the garage, along with the split bits of oak that we inherited from his dad.

In the stormy weather of February, part of the huge leylandii in the back of the garden came down and landed on the roof of the shed. As we couldn’t leave the three sizeable branches up there, we had to do some rope and pulley work to both get them off and make sure they didn’t fall in an uncontrolled manner. We certainly didn’t want them landing on our heads.

Once they were safely down and detached from the tree, Alex th

Old floor boards stacked by the fire place, ready for burning.

Old floor boards stacked by the fire place, ready for burning.

en started processing the branches into usable firewood. He had to make a new saw horse, a sturdy one that he could use with the circle saw without sawing through it. A few happy days were spent cutting and splitting the resinous wood.

But then where to put it? It’s green wood, so it really needs seasoning in an airy space. The wood shed was already quite crowded. We considered structures and places in the garden to put this new wood store, but didn’t really come to a conclusion.

The next job in the renovation project was to take up the suspended wooden floors downstairs in the old part of the house. There isn’t much you can do with old floor boards either. So we had another marathon process of sawing them into wood burner sized pieces. Most of those are now stacked in our living room, right next to the fire place, with room for more.

The leylandii logs seasoning in the new wood store - what you can do with a dog house and floor boards.

The leylandii logs seasoning in the new wood store – what you can do with a dog house and floor boards.

We also had an old dog house by the back door. It was taking up a lot of space, and we don’t own a dog. Alex had the luminous idea of using its roof and its floor to make an outdoor wood store.

In about half a day, he produced a tall contraption, with floor joists at the corners and floor boards as the open walls. He and his dad manhandled it into one of the flower beds close to the house, and Hilde stacked it with the logs from the fallen Leylandii.

We’re quite proud. It looks smart, and it keeps the rain out. The wood should be able to season quite effectively in there. And it’ll smell lovely on a fire.

How to instal a steel beam

We’ve pretty much done it. We have manhandled a 125kg steel I-beam from the front lawn into the big bedroom upstairs. There were no more than three people working at any one time. And I am relieved to report no injuries.

This was a job we didn’t expect to have to do. All we wanted was to move a partition to make space for a bathroom under the eaves. Thankfully, we found out in time that the partition was actually holding that part of the roof up. So we needed to replace it with something substantial.

That is where the steel I-beam comes in. But this presented us with a number of questions. For starters, our drive has a tight bend in it, and comes off a narrow country lane. No lorry of any size can drive onto our property. Neither could we get any major lifting equipment onto the back lawn. And what happens once you’ve got the I-beam in the room but not up at ceiling level, supporting the rafters?

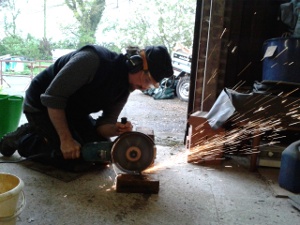
We would have to do this by hand, with only minimal equipment. In the end we used

– a home-made dolly on wheels
– a scaffolding tower
– blue rope
– lifting eyes and pulleys
– trestles
– bits of wood
– bottle jacks
– sheer muscle

The first hurdle was the delivery of the I-beam. Alex wondered how he would even get the thing off the delivery lorry. But the driver soon put him straight: just throw it off. It made a big clanging noise, but nothing was damaged. The dolly, with the two of us pushing, took it the rest of the way up the drive.

That little exercise made it obvious that Alex could relatively easily lift one end of the beam on his own, as long as the other end was supported. While he was preparing the room upstairs to receive the beam, he cooked up an elaborate plan.

He put in place additional wedges and pieces of wood so the roof could be supported with acrow props. He also built the scaffolding tower underneath the balcony window (where a balcony is yet to be built) which would be the entry point for the beam. He also made holes in the walls, ready to receive the ends of the beam. We mocked up the entire process with a 2×4 of equal length to make sure there was enough room to manoeuvre the beam into place. All looked well.

The first task was to simply get the I-beam from ground floor level into the room on the first floor. It was a stressful day, as it was all too easy to drop this heavy thing quite a long way. We made sure that the beam was always attached or supported in at least two places, so that we wouldn’t lose control in the event of anything failing.

We started by attaching a pulling eye to one end of the beam. With a simple rope and pulley, we managed to get it quite a long way up. We also needed to do some pushing at the other end, which was resting on the dolly. Our friend Tim helped us with this.

When the beam’s nose was resting on the edge of the scaffolding platform, we needed to lift it higher. Alex added another element to the scaffolding tower so the pulley could be attached higher up. With some more pulling and pushing, we got it even higher.

By then, we needed to start lifting the other end. We did so very carefully, resting the beam on trestles that got progressively taller.

At one point, we had a little incident where the trestles gave way and the end of the beam clonked to the floor. Thankfully we had been careful to not go and stand in the way of it, so no harm was done.

Eventually, we got the end of the beam as high as we could, and as far into the room as we could. Alex’s dad Roger came over to help us with that bit. Now, we could put pressure on the end in the room to level it out and just pull it inside, sliding across the scaffolding platform. Getting it inside the room was easy after all that, and we called it a day.

On the second day, Alex’s friend Andy came to help us out. Now that the beam was in the room, we needed to get it resting on the walls on either side. It was a slow process, where we slowly and carefully lifted the beam, always making sure it was attached to something solid. Even if one end dropped, it could never go very far. That day, we managed to get it resting on the wall on one side, higher than it should be. The other end was nearly up to the other wall, dangling from a rope.

The I-beam on day 2: nealry at the level where we need it.

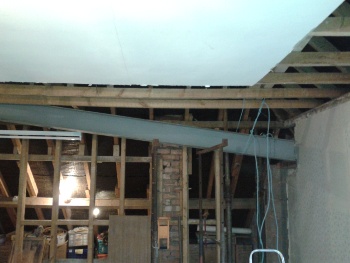
The I-beam on day 2: nearly at the level where we need it.

The third day, we did the same again, carefully inching the beam further up, securing it every time. Eventually, the beam was resting on the wall on both sides, raised on some bricks. It was more or less at the level that we needed it, but not quite in the right place. This was when we took the partition stud work out, making sure the roof was supported with acrow props either side.

On day four, we slowly inched the beam sideways, until it was resting under the wooden wall plate where we need it to be. The next puzzle was how we were going to crank it up so far that it was pushing up the wall plate and effectively lifting the roof. Alex decided the way to do this was to use bottle jacks to push the ends of the beam up, while supporting them with acrow props further towards the middle. With every pump of the bottle jack, the acrow props were tightened too.

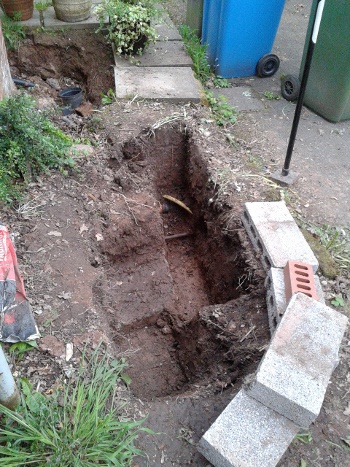
Today, one concrete pad was cemented into place under the end of the I-beam. It took some working out how to cement it in while it is tightly in place under the beam. Alex cleverly lifted it on some wooden pegs, and pressed the mortar in with a thin plank.

Tomorrow, the second pad will go in, and when all the cement has gone off, we can take away the acrow props. I’ll let you know if the roof stays up after that.

Critical paths to roof repair

A few months ago, we discovered we are going to have to do some work to keep the roof up. This is an unforeseen complication to our project, and we’re having to do some critical things before the work can be done.

We had it all beautifully planned, of course. We are going to super-insulate the house, which involves making an airtight envelope around the spaces we live in. We’re going to wrap the floor, the walls and the loft in hight quality insulating material.

We decided to start the job by taking the old insulation out of the loft. When Alex and his dad, Roger, finished that job, they discovered a distinct dip in the joists over the extension. A worrying dip, in fact. The roof was’t about to cave in, but we would have to do something about it before we could go ahead with the rest of our renovation work.

When a professional came to look at the problem, we also learned that the partition upstairs, which we wanted to simply move to divide the rooms up differently, is actually partially holding up the roof as well. It needs to be replaced by something more sturdy.

I-beam

Alex, the I-beam, and the dolly he constructed to get it up the drive. The answer to our roof problems.

The solution suggested by the structural engineer is to replace the partition with a steel I-beam. This is something we can do as a DIY job, with a little help from friends. 125kg worth of steel beam isn’t actually as heavy as it sounds.

But. We will have to get it up to ceiling height on the first floor and install it securely. There are a few practicalities obstructing this process.

We had not planned to do anything to this side of the house until after the insulation was in place. So we had stored our belongings in the big bedroom upstairs, certain that we wouldn’t have to move any of it until we could move into the renovated older part of the house. (Currently we live in a small flat in the extension.)

But because the beam has to go in, and the partition has to come out, and the ceiling has to come down to replace the bendy joists, we need to completely empty the room we never planned to empty. Alex has taken a few days to do just that, and puzzle all our belongings into the other two bedrooms.

Furthermore, we had also started constructing a raised vegetable bed outside the extension. In order to get the I-beam in place, we need to finish the foundations up to ground level, so that can be made good for the scaffolding to go up. The scaffolding we need to get the I-beam to ceiling level on the first floor, remember?

This wouldn’t be a problem if we weren’t having a typical English winter: either too cold or too wet for brick laying.

You probably knew that you can’t build a wall when it’s freezing. All the water in the mortar would just freeze and break apart your wall faster than you can build it. And the kind of rain we had recently flooded the foundations so we had to pump them out. If you tried to build in that kind of weather, your wall would be just as ruined for being too wet.

Did you know that you can’t build a wall with wet bricks? When you are building a wall, the moisture from the mortar is drawn into the brick, which helps to bond your wall together. If the brick is wet through, this can’t happen and you get a really weak wall.

So for that part of our critical path to holding the roof up, we will just have to wait for a couple of dryish, mildish days. Hopefully they will come soon.

Raised beds in a permaculture garden

Alex has spent several days digging foundations for our new raised bed. We’re going for large and tall. Raised beds have many advantages, but the hight we are going for is a bit of an experiment.

People have been constructing raised beds for vegetable growing for many years. Here are some of the very good reasons to do so:

Raised beds, when used with a no-dig system,
• improve drainage: the organic materials that fill them are ideal moisture regulators.
• save labour after the initial build.
• easier to get to: not as much bending over.
• contain the ideal nutrient mix for your veggies if you add mulches and natural amendments.
• usually improve yields.
• add different levels to your garden, making it look interesting.

We’re going for a multi-level raised bed, with the larger part of it quite high indeed. We’re making it about as high as a kitchen counter, but narrow enough that we can reach all parts without stretching. To contain that amount of soil, we are constructing sturdy walls. Hence the digging.

We're building a large and high raised bed. To contain all that soil, we need sturdy sides.

We’re building a large and high raised bed. To contain all that soil, we need sturdy sides.

One of the main aims of our gardening project is to grow more food. This raised bed will help us do that, in various ways.

  1. We are adding a significant amount of vegetable growing space.
  2. The bed is located by the South wall of the house, one of the few sunny spots in the garden.
  3. It’s close to the house, so we’ll be able to keep an eye on our plants very easily, weeding as we pass.

The raised bed will make it easier for us to reach our goal, to grow more vegetables, in different ways. And that is a principle of good permaculture design.

Preserving your fruit harvest for Winter

Westacre’s fruit harvest has been incredible this year. There are so many apples we don’t know what to do with them, and the damsons were hanging like bunches of grapes, bending the branches to the ground.

We can’t possibly use all of that harvest. We just haven’t got the capabilities to process it all. We’ve already got a jar of damson jam for every week of the year, and more damsons waiting in the freezer. We were making jam with 10 kg of damsons at a time.

Damson jam all jarred up

Damson jam all jarred up

Giving away jars of jam to friends and family helps, of course. We have also made apple sauce, which is waiting in the freezer to accompany sausages, or to become apple pie. The next thing we will try is apple butter, which is lovely on toast.

Here are some recipes you may find useful:

Damson jam

Apple butter

Apple sauce. Our apple sauce is just boiled up chunks of apple. We can flavour it to taste when it comes out of the freezer. The recipe linked here is quite simple, too.

Taking our time and getting it right

Finally, at long last, we ordered our new windows for Westacre.

It took us months to get it right. This is the single largest expense for our eco-renovation project, and we had to try different compromises between energy efficiency, cost, and aesthetics.

We got quotes from several high-end window companies. We were after windows that would give us a Uw value of 0.8 or lower. And we knew we would have to pay for the privilege of having well insulated windows.

Our experience with the different companies was variable, but we ended up with a few likely contenders, including Uniwin, based in Scotland, and Russell Timbertech, who had competitive prices.

A local company, Spectrum, based just 20 minutes’ drive from here, sells and installs Internorm windows. They were friendly and helpful from the start and prompt in their replies to our e-mails. So although they didn’t give us the cheapest quote, we decided to go for known product quality and support a local business.

With Spectrum’s help, we went through a number of permutations in our requirements.

At first, we thought we wouldn’t be able to afford aluminium clad wooden windows and we were looking at alu-clad uPVC. But with the discounts Spectrum was offering at the time, the price difference wasn’t that great, and we decided to go for the wood after all. This gives us a better insulated window with a Uw value in the region of 0.7.

We also considered the final look of the renovated house. Having looked at houses of roughly the style and age we are trying to emulate, we noticed that many of them have white casements inside black frames. They look very smart and trying to copy that look would help us get the Edwardian period feel we’re after.

Turns out, though, that opening windows are quite a lot more expensive than fixed ones. All those moving parts do add to the cost. To remain somewhere near our budget, we had to minimise the number of opening windows in our order. And if our windows didn’t open, we couldn’t have them in two colours.

The final order we placed with Spectrum is for all white windows at the front of the house, and dark grey for the side and the back. They will be aluminium clad wooden windows, that will give us great insulation and, hopefully, a good looking house.

We are expecting delivery and installation towards the end of November.