Author Archives: hilde
Hatching a new life
Insulating the loft
This last week or so, Alex has started constructing a floor in the loft. When it is finished, we will be insulated from the cold by a lasagne of many layers.
The ceiling will be made of ordinary plasterboard. We’re not just attaching it to the bottom of the joists, though. We’re raising the ceiling a little by putting the plasterboard half way up the joists.
Above the plasterboard, we’re having a cosy layer of non-mineral insulation wool.
Next is the OSB floor that is being installed right now. It is tongue-and-grooved on four sides, so it fits together tightly. Any gaps are filled with the black sticky stuff that we’re also using on the external wall inslation.
On top of the OSB we’ll be putting 15 cm of Celotex insulation foam. Around the edges, where the roof comes down low, there will be woollen insulation instead.
And finally, on top of the Celotex, we’re putting a layer of thin plywood. We will need to be able to walk around in the loft, as it will be the nerve centre of our house, with lots of pipes, cables and ducts leading off in all directions.
We are doing this work now, so that we have something more than just plaster board, floor boards and roof tiles separating us from the frosty night air. It should instantly give us some more warmth in our temporary flat.
Who does the Grail serve? An Imbolc healing
The place beyond emotion
Spirit of place
Who do you share your space with? Tumblr blog post.
Extending the rafters
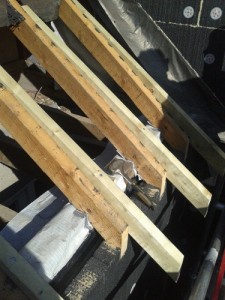
One of the many processes we’re going through in the Westacre renovation project is making rafter extensions. It involves a lot of careful measuring and sawing.
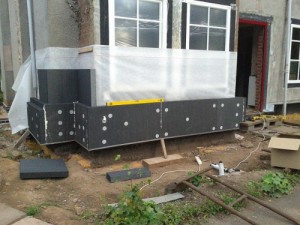
We’re installing external wall insulation, hoping to get our 1930s semi to near passive house standard. It is making our walls 16cm thicker. And that means the roof needs to be extended on all sides to cover that thickness.
Where the rafters come down to the wall, we have to make them longer. We’re also kicking them out slightly so that making the roof wider doesn’t also mean making the eaves lower, which would cover the tops of some of the upstairs windows.
Because this is a renovation, we have to work with the existing building. Working on some of the earlier rafter extensions, we noticed that just making identical pieces of wood does not make for a straight roof edge. Evidently, the angle of the roof isn’t uniform.
So in the section we are currently working on, we have had to make some extra measurements.
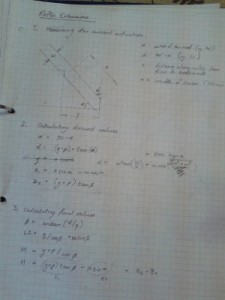
We measured the horizontal and vertical along the joists, so that we could calculate the angle of the roof at each of those points. The angles varied from 31.2 to 32.5 degrees. Over the length of the joist extension (132 cm), that makes quite a difference.
Alex fed the numbers into his computer. It calculated the equations and told us the exact angle of the birds mouths in the rafter extensions, and the height of the blocks that they will rest on. We meticulously measured those out on the wood and tried to cut them as precisely as possible.
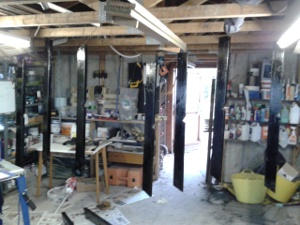
The next step was to paint the rafter extensions black. We’ll have to protect the wood somehow, and we’ve decided that black wood against the black roofing felt will probably look better than very blonde pine. It’ll also hide a multitude of sins going on under the eaves.
We hung the rafter extensions from a wire in the garage for easy access and painted them with bitumen paint. That was a sticky couple of hours for Hilde and Roger, Alex’s dad. Sometimes we’re very grateful for small mercies like rubber gloves.
When we get back from Belgium, we’ll be nailing the blocks and rafter extensions into place. And then we can finish insulating that long wall. That’ll complete roughly 2/3 of the external wall insulation. We’ll be waiting for more clement weather to do the remaining third.
A holiday for the mind
The Westacre Project – looking back at 2014
It is a truth universally acknowledged that big projects never go the way you expect. Ours is no different. But we have done some great stuff in 2014.
The year took a while to get started. The winter was mild but relentlessly wet. In the early Spring, it did stop raining, and we started preparing for the great work of insulating the house.
Installing external wall insulation doesn’t start where you expect it to, though. Why you would make a substantial raised vegetable bed in order to insulate a house isn’t exactly obvious.
It’s because of the earth works. You need to insulate right into the foundations to below the level of the insulation under the floor. So we had to dig out all the foundations. The spoils of the digging works were transferred into the raised vegetable bed. Which is as huge as we could make it, but still nowhere large enough for all the soil we dug out.
And of course, once you’re digging, you may as well dig the path we are going to have all around the house, with the help of a posse of friends. It was a good idea to have the paths ready, so the scaffolding we’d need for installing the insulation would have something level to stand on. And while you’re doing that, you may as well dig the trenches for the drain pipes around the house. No use filling in the path and then having to dig it up again another time.
Consequently, the first half of the year was taken up with earth works of various kinds. We finished the raised vegetable bed with sturdy timbers and
- dug out the foundations.
– spray-insulated the foundations.
– uncovered drain pipes.
– dug out pathways around the house.
– created new trenches for new pipes.
– laid the pipes and connected them up with the existing ones.
– made foundations for the balcony we’ll eventually build.
– filled all the trenches in again.
– covered over the new pipes complying with the building regulations.
– created brick edges for the paths.
– filled the paths with gravel.
And only after that were we ready to start putting insulation on the house. Which requires a lot of measuring and cutting of polystyrene. And a lot of drilling holes and hammering in fastenings. And because we’re particular, we are also filling any gaps with expanding builders’ foam.
Of course, the polystyrene makes the walls 16 cm thicker, so we also have to extend the roof in all directions. We extended verges by adding an extra rafter, and eves by lengthening the rafters. A lot of meticulous measuring and cutting.
The insulation is not just polystyrene, though. Far more is going on underneath.
- A vapour barrier, custom tailored for the house.
– The wall around each window carefully smoothed out with crack-free render.
– Then the gap between render and window frame filled with a fibrous filler.
– An airtight membrane with a rubber gasket pushed into the window frame.
– Membrane glued to the wall.
– Vapour barrier glued to the membrane.
Hopefully, all of that will make the result pretty air tight.
By now, a few days after Christmas, we have covered just over half the walls with external wall insulation. And some of that has been covered with render by our plasterer. At least we have some idea of what the place is going to look like.
A few other jobs got done as well:
- Steel I-beam installed to replace the partition that was holding up the roof.
– Floor in the old kitchen and dining room taken out.
– Floor boards used to make a new wood store.
– Ceiling joists in the big room upstairs replaced with bigger, better ones.
It feels quite satisfying looking at it all like that. We have worked hard and achieved an awful lot.
Not according to plan, of course. If all had gone the way we imagined it, we wouldn’t have done most of this year’s work ourselves – or even at all. For one reason and another, these jobs added themselves to our list. That has slowed us down quite a lot, but we have learned so much in the process.
We’re having a rest now. And who knows what adventures we will have in the year to come…
